Friday, February 25, 2011

Advanced Pastry- Hamburger Cake


This week we assembled our hamburger cakes. My plan was to take a kids lunch tray and make a “school lunch” with the hamburger being the main item. I wanted to do more than just a cake and I knew that this would be different than everyone else’s.

Last week I made many of the base items for assembly. I colored all my fondant, made my tots out of rice crispy treats, made the base of my milk container and hamburger patty out of rice crispy treats, made and orange gelee and poured it into a half sphere shape to set up with two plastic play food orange slices on top to give it the real orange look, and shaped my hamburger buns.

Before I came to class this week, I made a list of everything I needed to get done and the order I wanted to do it in. I began by placing the completed items on the tray. I had made small chocolate chip cookies to use as the “dessert” portion of the tray and my tots were also complete. From there I cut and covered my “milk carton” with a single layer of white fondant to give it a smoother look. I put it in the fridge to set up a bit and moved on to covering my hamburger buns. I covered them both with a tan fondant and then brushed a little brown dust on them to give them some shading. I love how it turned out. I think it looked just like a whole wheat bun! I even gave it some little grooves in the top like buns usually have. Then I created my “toppings” for the hamburger- American cheese, lettuce, and tomatoes. I shaped and painted these and smeared some “mayo” on the top bun and it was ready!


I quickly made some “ketchup” from corn syrup, powdered sugar, and red food coloring. I would like to experiment with that a little more because it needed to be a little thicker and as it sat, it started to get some little bubbles on the top.

I then moved back to working on my milk carton. Next time I would shape the carton to have a peak in it instead of just square because the top sunk a little and wasn’t as rigid as I would have liked. This class is all about learning, though, right? Once I had it satisfactorily covered, I painted on it with a mixture of shimmer dust and food coloring. I was able to do this fairly quickly and neatly due to my many years of pottery painting experience.

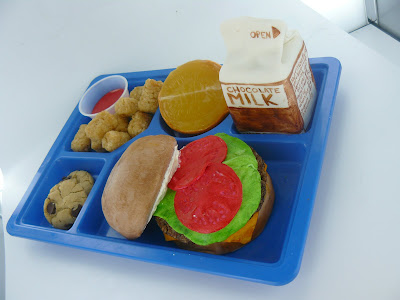

The milk carton was definitely the hardest part. Once it was done, all I had left to do was cover my “orange” with a peel. I put a little icing on the orange and covered it in orange fondant. I then used a tool to make little divets in the orange skin to make it look more realistic, and painted a white line into the middle of the gelee for the core of the orange. By that evening, the fondant had begun to fall off the orange, so I would probably need to let the gelee come to room temperature and THEN cover it so the condensation wouldn’t turn the fondant to goo.


My friend thought I looked like I was at school eating my lunch while I was sitting and painting so we just had to take a picture when it was finished of me pretending to do just that.


Overall, I was EXTREMELY happy with how it turned out. This class is so much fun!! I love not only creating cakes, but seeing all the other creative ideas my classmates have. It’s amazing to have so much creativity in one room. I think it’s the quietest lab I have ever worked in because we all get pretty involved in our own work.

Bag Cake- Finished!!


This week we completed our bag cakes. Tuesday I went in during my break between classes and piped royal icing onto my wand and tiara so it would have a chance to harden overnight.


I also formed the upper part of the shoes and created the isomalt jewels and broken “glass” to use for decorations on the tray. I also couldn’t help myself and made a ring for an additional item.


I think my cake turned out very well. There are always things that I would change for the “next time”, but overall I am very satisfied with my product, especially given the time constraints. I absolutely LOVE how the flower came out, though! I had fun with the colors on this cake. I used straight luster dust, as well as luster dust mixed with food coloring and, in some instances, coconut extract (which made it smell amazing, by the way) to layer the colors to get the affect I wanted. I ordered several sizes of "pearls" for the center of the flower from Sugarcraft. Then I shook them with the luster dust to give them the various colors I wanted. As a reminder, here is the bag from DavieandChiyo on Etsy that I was using for inspiration.


When shaping the heels of the shoes from rice crispies, I forgot to take into account that the fondant was going to make them even fatter. Next time I would make them a little smaller from the get go and carve them into a more feminine heel. I would also paint the underside of the overlay or use colored fondant instead of white.


I would also make more of the tiny pink sugar jewels and use them for additional garnish all the way around the base of the tiara and on the handle of the wand.
I hadn’t worked with sugar like that before and I found it really fun. I found myself wanting to keep playing with it, but I didn’t have that kind of time. I tried to fashion the upper part of the shoes from sugar, but it was difficult to keep it at the exact right temperature when it came to cutting and molding them. I also needed something to shape it OVER because it was too warm to use with the playdoh (I covered it in plastic wrap, of course.) Again, I think clay may have worked best for that.

I love the creative process when it comes to figuring out what to do for a cake. My mind goes around and around and around and all of a sudden I get inspired and the whole plan just flows out onto paper. I think that my presentation came out how I wanted it. I really wanted to make a larger, round, clear sugar “platform” to set the crown on, but I didn’t end up with that kind of time.

I think we had plenty of time to work with, but when it comes to this kind of thing, one can ALWAYS use more time to continue to improve the cake and add more details. The details are what gives these kinds of cakes their “wow” factor. The only thing that is mildly frustrating is having to wait a WHOLE WEEK to finish a cake. I would rather just work straight through and get it done than have to think about it for a whole other week!

Next week we begin our Pastillage Sculptures!

Bag Cake- Week 1

This week we began making our Bag Cakes. I wasn’t thrilled with the bag cake assignment at first. Any of you who know me, know that I am not a big “girly girl” and handbags are not really my thing. I had picked a bag, though, that I found on Etsy and thought was pretty.


Along with the cake, we have to make 5 items that go along with the cake. I chose some princess items from the girls dress up box. Wednesday morning before class, I got inspired. Pinkalicious!! Pinkalicious is a book, for those of you without children, that is about a girl who loves pink so much that she eats too many pink cupcakes and turns pink herself.


My amazingly artistic niece, Delaney, did a school project on Pinkalicious awhile ago, and this cake is dedicated to her.


So I started out by laying out all the items I was going to make on the table in front of me. As I created each item, I moved it back into my bag so I made sure I didn’t miss anything. I colored my fondant light pink. I used gum paste to create the crown and wand and I made impressions into the gum paste with the actual pieces as a guide. I will pipe royal icing onto the impressions and paint it.


I made the heels for the shoes from rice crispy treats and then used gum paste to form the sole of the shoe. I made a box from rice crispy treats to cover in fondant and paint into a Princess by Vera Wang perfume box. I made the flower to go on the cake. I layered and shaped my cake and crumb coated it.


Next week I will cover everything in fondant and make jewels and “glass” from isomalt. I actually have a HUGE comprehensive list of what I need to do but I will not bore you with all of that. Next week you will get to see the finished product!!!